Digital Photography

How To Hold A DSLR Camera?

Holding your camera in a right way matters in photography. Beginner photographers try to grab the camera however it is easy for them. Even though there is no standard written rule to hold the camera, best camera holding technique could lead you to the better shooting experience. I have seen many people holding their camera in a wrong way and the result is obvious; shaky pictures because of the instability of the camera during the shutter release time. Camera positioning and holding is very important point you have to remember every time you go for the shooting. If you are using VR lens for the shooting, minor camera shake doesn't matter because VR (Vibration Reduction) lens is made for that purpose. But it might not be the case always. That's why it is important to be mindful about the camera holding techniques and bring the perfection in your shooting.

When you shoot fast moving subject (sports photography) or do macro photography or night photography, it is always recommended to use a tripod to avoid camera shake. The reason is, you need a quick action, patient mind and sometimes long exposure settings for those kinds of shooting. There is no hard and fast rule to hold the camera and it varies from person to person depending on what kind of camera they are using and what style they are comfortable with. But let me write down some of the techniques that I follow while shooting either handheld or on the tripod.

Camera-Holding-technique.jpg

1. Use your right hand to grip the camera body from the right side of the camera. In this positioning you can use your thumb to adjust the settings by using the command dial and the index finger to focus and release the shutter button.

2. Support your camera specially the lens using your left hand and place it in a proper place on the lens barrel so that you can adjust the focal distance using the lens ring.

3. If you are use the Live View mode to shoot, you can skip this point but if you are shooting using the viewfinder which I normally do, make your body close enough to the camera body so that you can see the subject from the viewfinder comfortably.

4. Use a tripod for better stability of the camera body but it's not necessary always except in a few situations which I mentioned above.

These are the general conventions to hold the camera body and the lens but not the rule. But I believe that if you follow these guidelines, it definitely helps you to shoot comfortably while maintaining your full focus on the subject.

Histogram - An Important Tool To Analyze Your Photographs

Histogram is a graphic representation of the tonal range in a photograph, and it's analysis of the image's tonal range provides a precise check on the exposure. Does histogram really help photographers to understand their images? Yes, it helps photographers to understand the tonal color structure of the photographs. Histogram can show whether your photograph is composed of the dark tones, light tones or the mixed color tones. Histogram can be represented with 256 color tones in a digital format in which the darkest color tone is represented by the number 0 on the left side of the graph and the lightest color tone is represented by the number 255 on the right side of the histogram graph. On the tonal graph, the horizontal axis displays the color tones from the darkest on the left to the lightest on the right and the vertical axis shows the number of pixels that each color tone has. When you frame and compose the shot, your camera's light meter reads the scene before you take the photo and the histogram analyzes the photo you've just taken. You can choose to have a histogram graph appear on the camera's LCD along with the playback display of your photo by using the Multi-Selector Dial button.

Why histogram is so important in photography?

It is a very important graphic tool because it helps to understand the exposure of the photograph you have taken and tells you if it is necessary to adjust the exposure or not. It's not necessary to check the histogram graph for each and every photo you have taken but it's good practice to check the histogram when the scene's lighting condition is tricky. When there are areas of deep shadow and the bright light in the same scene and you're going to take a series of images in the same setting and want to be sure that the exposure is balanced, histogram graph might come handy.

What can anybody get from the histogram graph?

Histogram will tell you if the photographs or parts of the photographs are overexposed (lack of details in the highlights) or underexposed (loss of details in the shadows). When you look at the histogram graph and there is a heavy concentration on the left side of the graph, that means the image is underexposed and you've lost the details in the shadow areas. Likewise, a heavy concentration on the right side of the graph means the image is overexposed and your highlights may be blown out. When you see any one of these kinds of histogram graph, you can think of a solution to balance your exposure whether it is underexposed or overexposed. If your photograph is overexposed, you can increase the shutter speed, close down the aperture or lower the ISO to balance the exposure. And if your photograph is underexposed, you may want to decrease the shutter speed, wide open the aperture or increase the ISO sensitivity level little bit while considering the possible noise in the photograph.

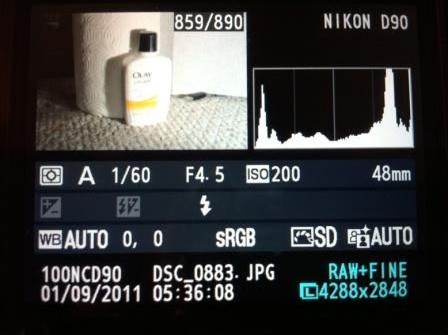
Let's examine these couple of photographs below and analyze the histogram graph so that we can apply it to the practice.

Underexposed Histogram

Underexposed Histogram

You can see fair amount of pixels are shifted on the left side of the graph because the photograph is composed with the dark color tones (shot at night) and it is little bit underexposed. You can see the large amount of pixels are in the middle of the distribution indicating that there are mid-tone colors. That's why it is a good idea to shoot in RAW+JPEG mode because sometimes, it is possible to retrieve those loss tones in RAW images but in JPEG mode, it's permanently lost.

Now let’s see an example of overexposed image and see how the histogram graph indicates the problem.

Overexposed Histogram

Overexposed Histogram

Here you can see a lot of spikes of pixels on the very right side of the graph indicating that this photograph is overexposed and the highlights are blown out destroying the details in the picture. It has quite a few pixels on the left side as well which tells us that the part of the image is underexposed as well.

You can also set the highlight overexposure warning (default in Nikon D60 I think but has to setup in D90) in your DSLR camera settings. When you set this option, the areas of overexposure will blink in the playback image and you will know exactly which areas of the image are overexposed. Several Nikon DSLR models feature secondary, color histograms, and if you choose to display them, you'll see three small graphs that show the intensity of the RGB (Red, Green and Blue) color values in the scene. If you need to adjust these values, you can do so by controlling the white balance setting in your camera. Some of the Nikon DSLR cameras also allow you to magnify specific area of the photograph during the playback so that you can check the exposure and detail rendering in very specific parts of the image. In effect, you are directing the histogram's area of analysis.

I encourage you to take some pictures and analyze them using the histogram graph and the more you use the graph, more you will be familiar with what histogram can tell you about the photographs.

Brief Introduction To Macro Photography

Macro photography is also called "close-up photography". It is the photography art to produce very fine details of relatively small subjects like spiders, bugs, insects, flower petals etc. When you do macro photography, you basically magnify your close up subjects using the lens glasses. There are some zoom lenses available for the Nikon D90 and other DSLR cameras as well which have particularly close focusing capabilities, making them macro lenses. When you use that type of lenses for macro photography, you may not get the best results when you go more closer to the subject as you can't get more lights into the censor bouncing through the subject. Camera to the subject distance is the most important factor when you are doing macro photography. So in this case, we can have few other alternatives for macro photography. The first one is getting a dedicated macro lens and the second one is to use the extension tube attached to the regular lens. Depending on the budget and the type of camera you have, you might have to go with either one of the two options I just mentioned above.

If the budget is not an issue for you, the best option would be to get a DSLR camera and a dedicated macro lens which fits into the camera. Nikon, Canon and other camera brands provide a dedicated lens for macro photography which is specifically designed to take a close up images allowing more lights into the subject which then passes to the camera sensor through the lens. Such dedicated macro lenses are built with 1:1 magnification capability.

Macro Extension Tube for Nikon

Macro Extension Tube for Nikon

And the second alternative is to use the extension tube which goes between the camera body and the lens. Extension tubes do not have any optical components. It just extends the distance of your lens to the sensor or the film so that you can shoot in a closer focusing distance and achieve a greater magnification. There are different types of extension tubes available in the market. You can use any one of them based on your camera type and the lens specifications.

There are various other cheaper ways to shoot macro as well. For example, you can also use the filters like diopters that goes in front of the lens. I have read somewhere that you can do macro shot with the reverse filters too.

Personally, I think have a dedicated macro (some brand also says micro) lens is the best option to achieve a crisp, clear and magnified details of small subjects which we called macro photography or close-up photography.