Digital Photography

Inverse Square Law In Digital Photography

The title of the blog suggests that it would a math or physics article but please read until the end and I promise that it would be a interesting read once you find its connection with photography. Today’s topic is practically very important if you are dealing with flash light or studio strobe in your day to day photography. So, without wasting any time, let’s get right into it and see how can we apply the law into our photography world.

In physics, an Inverse Square Law is defined as "any physical law stating that a specified physical quantity or strength is inversely proportional to the square of the distance from the source of that physical quantity". And mathematically, we can write this law as,

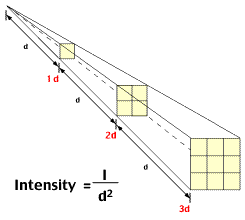
Intensity=1/d2, where d is the distance between the light source and the object.

Inverse Square Law

Inverse Square Law

If you have read the definition carefully, it mentioned “any physical quantity or strength”. That means anything on this earth can be related with this law (for e.g. force, energy, light etc). But today we are going to relate the law with photography, and that means we will talk about the light source and its relation with the distance to the subject. We just looked at the mathematical definition of inverse square law, which shouldn’t scare you even if you are not a mathematical genius. Let me try to decode the formula and explain it in a simple language. Basically, the formula says: the intensity of the light is inversely proportional the distance to the light source, which means the light gets brighter when we are close to the light source and light gets darker and darker as we increase the distance from the light source. I am pretty sure that you would agree with me on this statement and can be related to your daily experience as well, right?

We just discussed the essence of the formula but let’s try to define it again with more precision. And, that is: an object that is two times far from the light source will receive a quarter of the illumination. In photography world, this means, if you move your subject from 1 feet to 2 feet away (double the distance) from the light source, you would need four times as much light to get the same exposure. It’s because according to the Inverse Square Law, light intensity at the 2 feet distance will be 1/4. This extra light can be achieved by changing either Aperture, or Shutter speed, or ISO value by two full stops and compensate the exposure. If you change the aperture, you would need to wide open the lens by two full stops and if you plan to change the Shutter speed, you would need to decrease the shutter speed by two full stops to allow enough ambient light to get the proper exposure. Similarly, you can also change the ISO value by two full stops to get the same exposure.

This light fall-off behavior is pretty interesting if you do more research. As you move the subject far and far from the light source, light fall-off is not that much significant as it is in the beginning. Let’s say you get 100% light in 1 feet distance from the light source, we can form the following table to analyze the behavior of the light with the distance.

Distance Intensity of Light

1 1 (100%)

2 1/4 (25%)

3 1/9 (11%)

4 1/16 (6%)

5 1/25 (4%)

6 1/36 (3%)

7 1/49 (2%)

8 1/64 (2%)

9 1/81 (1%)

10 1/100 (1%)

So when you move the subject from 1 feet to 2 feet from the light source, light intensity will be decreased by 75% but when you move further from 2 feet to 3 feet and 3 feet to 4 feet and so on, light fall off is very minimal and at the end there is no difference at all. It clearly demonstrates the importance of a distance and shows how it affects the behavior of the light. You might find this helpful in the future whenever you are dealing with lights, especially flash lights or studio strobes to illuminate your subject.

Use Panning Technique To Shoot Fast Moving Subjects

Panning is the photography technique which is primarily used to show the motion of the fast moving subject. The basic idea behind the panning is to follow the moving subject with the camera as it crosses your field of view, resulting in the subject being sharp and the rest of the shot including the background image blurred. Relatively sharp subject and the blurry background gives the feeling of the movement and the speed. It’s particularly useful in capturing any fast moving subject like racing cars, running animals, cyclist etc. If you want to master the panning technique, first and most importantly, you have to follow few simple rules and then practice with a lot of patience. Do not get frustrated with some blurry subjects initially. Panning is a skill which can be learned over time but you need to experiment with many variables including your camera settings, your distance with the subject, shutter release timing etc., which we will discuss later. In order to get the good result with panning, the ideal flow would be - maintain a balanced distance with the subject, use a little slower shutter speed, follow the moving subject and pan your camera along with the subject on the same plane of the motion, take the shot and continue to pan in the same direction.

Here are few guidelines you can follow to properly apply panning technique.

1. Use the Shutter Priority Mode.

2. Start from a slower shutter speed (1/15s - 1/30s) and go up or down little bit as you need depending on the speed of the subject and the lighting conditions.

3. Shoot in a Continuous Autofocus Mode because your subject and the camera are constantly moving in proportion to each other. This way camera continuously track and focus the moving subject.

4. If your camera doesn't support autofocus, you have to judge the traveling path of the subject, determine the subject's final point for the shooting and pre-focus on that point and then take the shot.

5. Use a Continuous Shooting Mode or a Burst Mode so that you can have a multiple shots and will have the flexibility to choose the best among many shots.

6. Position yourself parallel in front of the moving subject. If you keep larger distance from the subject, it might decrease the speed of the subject in relation with you and your camera, but it also reduces the effect of panning, and the effect is often why we do the panning. So, you have to balance the distance with the subject and the speed of the panning.

7. Place your subject position fixed in your viewfinder and smoothly move your camera as the subject moves on it's track.

8. Continuously follow the track of the moving subject, take the shot and keep moving the camera as if you are taking a shot. This will create a soft transition and gives better result.

9. If you need an extra support for heavy camera and big lens, you can use a tripod which supports panning feature. It gives extra stability to minimize the motion blur on the main subject.

Panning Technique (Image Credit : AdoramaTV)

Panning Technique (Image Credit : AdoramaTV)

Exposure : 1/30 sec     Aperture : f/14.0     Focal Length : 200mm     ISO : 100

If you are new to this technique, do not expect to get a perfect shot in the beginning. You have to keep experimenting with different settings until you get the best result. Also using this technique, you might not get a super sharp result but panning allows you to shoot the moving subject smoothly and at the same time gives you the feeling of the motion. If you do it right, you will get the subject relatively sharper than the motion blur background, which is the main idea of this technique to give a sense of the moving subject. Here is something I tried during my recent visit to New York City.

New-York-Traffic.jpg

Exposure : 1/15 sec     Aperture : f/22     Focal Length : 16mm     ISO : 200

It's not as perfect as I would like it to be but I will try next time and keep practicing until I get the better result.

RGB Histogram And Highlight Overexposure Warning

Last time we discussed about the Histogram graph and it's significance in modern digital photography. I also mentioned that some of the modern DSLR models have the feature to automatically highlight the overexposure by displaying the warning on the histogram graph during the playback on the LCD monitor. When I had my first DSLR, Nikon D60, I experienced that this feature was enabled by default and I could use the Multi-Selector button to display the graph or hide it. But in case of Nikon D90, you have to set it up manually. So, lets go ahead and see how you can enable the feature on the Nikon D90 so that you can determine the exposure level right from the histogram graph. We will also see how you can set the camera to display the color histogram while previewing the photographs.

Figure 1 : Display Mode

Figure 1 : Display Mode

Let’s get into the Playback menu by pressing the MENU button on the back of your camera. While you are inside the Playback menu, scroll down to the Display Mode as shown in the picture, Figure 1: Display Mode.

When you click on the Display Mode, you will get three options: Highlights, RGB histogram and Data. All these options inside the Display Mode are disabled by default (on Nikon D90) and you have to enable them individually.

Figure 2 : Set Options

Figure 2 : Set Options

When you check on the Highlight option, it will enable the Highlight Overexposure Warning and you can see the blinking zone right on the histogram graph where the photograph or part of the photograph is overexposed. Second option, RGB histogram, will set the camera to display RED, GREEN and BLUE histogram on the LCD monitor while you are previewing the photograph using the playback button. That means you can now see the pixel values and the concentration of all the colors in the photograph. Last option, Data, will give you the details of f-stop, white balance and other EXIF (Exchangeable Image File Format) data related to the photographs.

I definitely recommend enabling the first option to highlight the overexposed area. And, if you are interested to know further, you can enable them all and see what kind of information your camera is providing to you about the photographs.

NOTE : Even if you enabled these options, you still have to use the Multi-Selector button to view them while previewing the photographs on the LCD monitor.