This post is a part of our Q&A section. If you want to submit your question, please use the form in the Contact page.

Ed (Colorado, USA) asked : I have heard the term "dragging the shutter" quite a few times from professional photographer. Do you mind explaining it with an example may be?
When you are shooting at night, you have to deal with different types of lights; flash light (if you are shooting a portrait), street lights and environmental lights. Sometimes you want to shoot without the background objects but there are times when you want to capture the beautiful background scene or nicely lit architecture along with your subject (portrait for example). If you have noticed latest point and shoot cameras or even some entry level DSLR cameras, there is a mode called "Night Portrait" mode which is basically an auto mode. If you turn your mode dial into Night Portrait mode, camera automatically manages the camera settings to capture the portrait along with the background lights. While using one of these auto modes, sometimes you get the good result but sometimes you may need more control over the exposure parameters or the flash mode to get more balanced result. If you want to control the lights and camera settings, you have to step up and dial into one of the semi-manual (S, A and P) or full manual (M) mode and set the parameters accordingly.
You might have used this technique before knowingly or unknowingly and you are just not familiar with the terminology which happens to all of us at some point. It is all about balancing flash and ambient light (light that exist in the environment). When balancing ambient light with flash light, photographers choose camera settings to retain the mood of place, time and environment of shooting. While doing so, we have to allow ambient light by allowing shutter to open little longer (dragging the shutter) and apply the flash light at the end of the exposure (usually to freeze the motion).
Dragging the shutter is very simple and also commonly used technique while doing night portrait photography. It is important to know whether you are using a Manual flash or a TTL flash setting with your camera. If you are using a Manual flash, usually Aperture, ISO, subject distance with the flash and the power of the flash affect flash exposure. Whereas ISO, Aperture and Shutter speed usually contribute to the ambient light exposure. That means you can use the Shutter speed independently to control ambient light exposure only because changing Aperture and ISO will also affect Manual flash exposure. The environmental light (also called ambient light) is continuous source of light but flash light is gone with the blink of an eye which is the main reason why we say Shutter speed doesn't contribute to the flash exposure.
But if you are using TTL flash, those four controls (Aperture, ISO, Distance and the Power) have no control over the flash exposure because your camera and the flash talk to each other based on the Aperture, ISO, distance to the subject and apply appropriate flash power to give the correct exposure. That means you can now use Aperture or ISO or Shutter speed to control ambient light without affecting flash exposure. Using TTL flash is relatively easy and you don't have to remember much while changing camera settings but if you are using Manual flash, you have to be very careful about what setting you have changed because if you change your Aperture, you have to change flash power or ISO or distance to compensate flash exposure but at the same time changing Aperture also affects ambient and hence you may have to adjust Shutter speed too. It's kind of confusing but enough practice clears confusion.

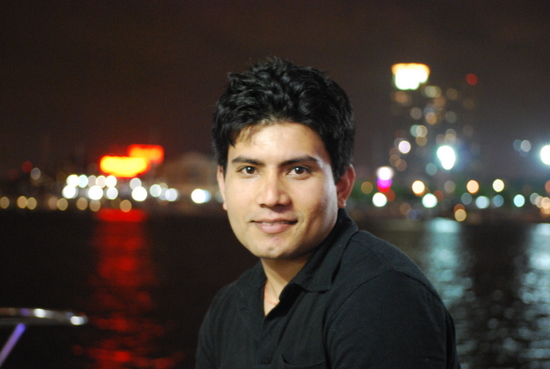
Night portrait
Shutter Speed : 1/60 Aperture : f/4 ISO : 220
Usually dragging the shutter slower than 1/60th of second allows you to register ambient light but you can change shutter speed as you need more and more ambient light. I usually use rear sync flash with slower shutter speed so that your final moment would be frozen.
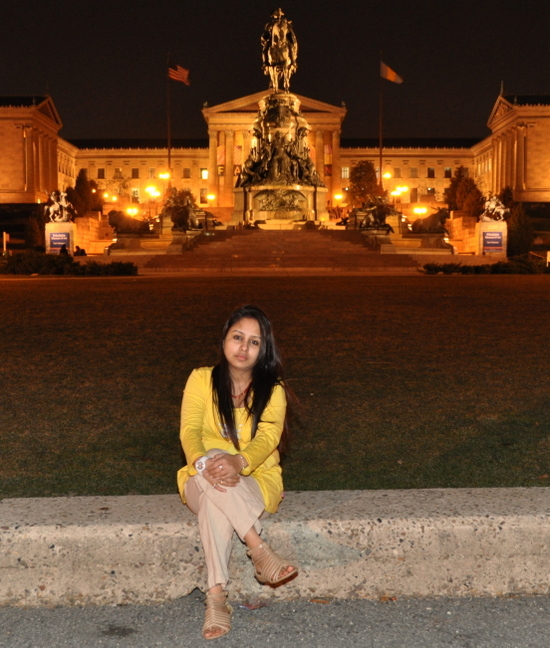
Dragging the Shutter
Shutter Speed : 1/5 Aperture : f/4.2 ISO : 1600
Dragging the Shutter
Shutter Speed : 1/3 Aperture : f/4 ISO : 800

Shutter Speed : 1/5 Aperture : f/4 ISO : 1600
These images are taken with TTL flash and you can see how changing camera settings is adopted automatically by flash unit and applying appropriate power to properly expose the image.