Last time we discussed about the Histogram graph and it's significance in modern digital photography. I also mentioned that some of the modern DSLR models have the feature to automatically highlight the overexposure by displaying the warning on the histogram graph during the playback on the LCD monitor. When I had my first DSLR, Nikon D60, I experienced that this feature was enabled by default and I could use the Multi-Selector button to display the graph or hide it. But in case of Nikon D90, you have to set it up manually. So, lets go ahead and see how you can enable the feature on the Nikon D90 so that you can determine the exposure level right from the histogram graph. We will also see how you can set the camera to display the color histogram while previewing the photographs.
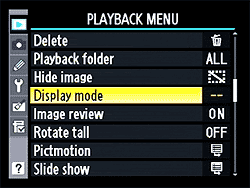
Figure 1 : Display Mode
Let’s get into the Playback menu by pressing the MENU button on the back of your camera. While you are inside the Playback menu, scroll down to the Display Mode as shown in the picture, Figure 1: Display Mode.
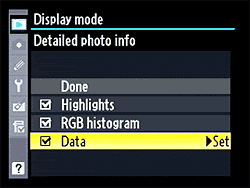
When you click on the Display Mode, you will get three options: Highlights, RGB histogram and Data. All these options inside the Display Mode are disabled by default (on Nikon D90) and you have to enable them individually.
Figure 2 : Set Options
When you check on the Highlight option, it will enable the Highlight Overexposure Warning and you can see the blinking zone right on the histogram graph where the photograph or part of the photograph is overexposed. Second option, RGB histogram, will set the camera to display RED, GREEN and BLUE histogram on the LCD monitor while you are previewing the photograph using the playback button. That means you can now see the pixel values and the concentration of all the colors in the photograph. Last option, Data, will give you the details of f-stop, white balance and other EXIF (Exchangeable Image File Format) data related to the photographs.
I definitely recommend enabling the first option to highlight the overexposed area. And, if you are interested to know further, you can enable them all and see what kind of information your camera is providing to you about the photographs.
NOTE : Even if you enabled these options, you still have to use the Multi-Selector button to view them while previewing the photographs on the LCD monitor.


