Daily Photography Tips

Janet Ochs Lowenbach

Varying Your Composition

This post is written by Guest Contributor, Janet Ochs Lowenbach. If you are also interested in writing a guest blog, please reach out using the form in the Contact page.

On a crisp, abnormally warm winter day, I decided to photograph a local amusement park that had been closed and made into an art center. Assignments like this are challenging because you have to try to do something different from everybody else. You have to go underneath the obvious scene (and its parts) and think about the meaning of what you see.  For example, does the building look abandoned and sad? Does it make you feel lonely?  Does a sign naming the park remind you of happy times? Does the carousel connote the laughter of children? By approaching the scene with an understanding of what it means to you, you can change the way you portray the park and it elements.

Glen-Echo-park-entrance.jpg

There are other ways that you can make your pictures alive. Look for shapes and lines, the quality of light, for repeating patterns, shots from far and near (or wide angle and telephoto),  parts of things that give the whole meaning, reflections – remember you can photograph anything you see-light and dark, textures.

Glen-echo-pattern.jpg
Glen-Echo-closeup.jpg
Glen-Echo-Park-2.jpg

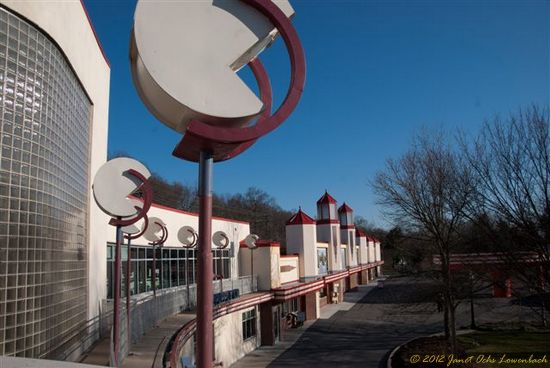
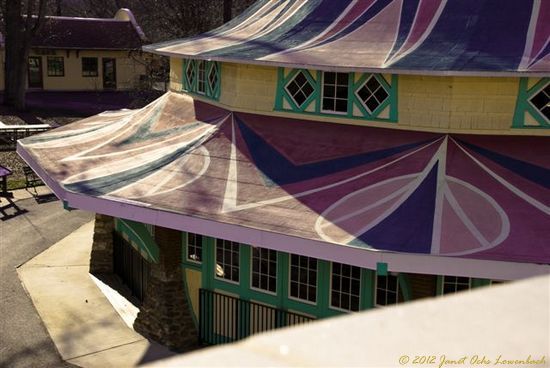
Sometimes people take 10, 20, or 30 pictures the same way over and over again. They stand with the camera at eye level, not moving, and go blam, blam, blam.  To change this boring approach, you must move into different positions when you take the picture. The result will be a new way of viewing the subject that you hadn’t thought about before. Eventually you will learn from your movements and be able to predict how you will change the impact of the photo. Repeat after me: up, down, over, under, past, by (past and by mean alongside an object like a wall). These changes add depth and impact to your photos. Note the grass shot from under the pattern of the mirrors on the white building which was top shot past, and the carousel pieces shot down and far and near. Note also that shooting up gives importance to the subject while shooting down diminishes it.

Glen-Echo-grass.jpg

Next time I will shoot more up and down and also demonstrate the impact of Lightroom which I used to edit these pictures.

Preventing Fungus From Destroying Your Lenses

This post is written by Guest Contributor, Janet Ochs Lowenbach. If you are also interested in writing a guest blog, please reach out using the form in the Contact page.

When you think about your favorite Nikon or Canon or any other DSLR brands, you don’t think about fungus — those spore-producing organisms like mildews, rusts, yeast, and mushrooms. I certainly didn’t think about them until the day I decided to sell ALL of my old cameras including the workhorses, lenses, and cases that I had used for 25 years. I had hoped to use the proceeds to buy some new equipment for my Nikon D80.

I remember it like yesterday. With a mixture of sadness at losing my old friends and delight  at the prospect of earning cash, I trotted off to Penn Camera in Rockville, MD. My equipment took up four bags.

Duane Heaton, the sales manager at Penn lined up all my gear on the counter and then pulled out a magnifying glass. “Let’s see how clean they are,” he said. Then he put down the glass and shook his head.

I began to worry. Duane opened the lenses wide and told me to look inside. It was unmistakable. The lens opening was lined with a fuzzy grey growth. The same growth lined every single lens and the two bodies. “That is a fungus,” he said. “It is contagious. It will eventually cover all the equipment, the bags, and even the cabinet you stored your equipment in.”

I soon learned that fungus grows in the lens and under the lens coating; it etches the glass. Fungus thrives in dark humid places where there is little or no movement of the air. Once fungus starts to grow; it is difficult to eradicate, and it causes soft spots in photographs that look like there is a fingerprint on the lens.

“Could I clean the equipment?” I asked

“I don’t advise it; it’s prohibitively expensive.”

“Can I sell the cameras?”

“Absolutely not. The fungus is contagious.  You’ll have to dispose of the cameras and scrub the closet with Lysol or bleach.”

I never knew cameras were sensitive to moisture in the air.

“It's not your fault,” Duane said. “Whenever you swoop down from the mountains to the DC area, you are entering a moist place. The district was built on a swamp and that moisture fosters the growth of fungus.”

What was Duane’s advice? Don’t store cameras in the basement. Keep them in a bright area upstairs. In your camera bag, a closet; keep silica gel packs in the bags. They are desiccants -- something that dehumidifies the area around your equipment -- and include a humidity indicator strip. Humidity should be between 35 % and 45 %. If the humidity gets too low – say below 30 percent -- you might dry out the lens and the components. If it gets too high, you run the risk of fungus forming.

Ultimately you can help prevent fungus by providing movement and exposing the lenses and cameras to light and air.

Just for the sake of memory, I photographed the cameras and lenses before they were trashed. Twenty-five years of equipment would generate dust instead of cash.

I have since learned that there are people who can clean fungus from lens. They are listed on the web, but it is important to ascertain the quality and cost of their work before making any commitment. It is hard to remove fungus and it can come back. But you might want to check out the options.

Sunset Photography Tips

This post is written by Guest Contributor, Janet Ochs Lowenbach. If you are also interested in writing a guest blog, please reach out using the form in the Contact page.

The setting sun is one of the glories of the day and possibly the best memory of a vacation. But it takes some skill to produce photos that stand out from the crowd. First off, decide what you will include in your shot. Go to the site an hour ahead (you might want to look up the time of sunset earlier in the day), and walk around. See what scenes you might want to include and what objects you might want to place in the foreground of the shot for interest. (Silhouettes in the foreground are a valuable compositional device.) Plan to bring a tripod.

You might even go over the possible exposures in your mind. (It is best to use the smallest possible aperture is to increase depth of field.) Even though the sun is going down, it is important not to look directly at it when it is too bright. A rule of thumb I use is to hold my fist up to the horizon; I can shoot when the sun is below that. Frankly I have also looked directly at the sun when it is higher, but I am here to tell you I have read enough to know that is a very dangerous thing for your eyes and the camera itself. IT ISN'T WORTH IT! It is particularly important to never look directly at the sun through a long lens, which magnifies the light.

Begin taking the shots a half hour or so ahead of the event– the clouds take on wonderful colors before and after sunset. There is something exciting too about photographing the sun continuously as it dips below the horizon.

Sunset at Bailey Island

Sunset at Bailey Island

Plan to shoot at a variety of focal lengths –sometimes a wide panorama is best; sometimes you will want to narrow the field.

Sometimes the lack of contrast makes it hard to focus when the camera is on automatic; sometimes the shot won’t work at all and sometimes the camera misfocuses, but you won’t notice the fuzz until later. So make sure you take a fair number of shots on manual focus!

Remember the rule of thirds, and keep the major elements of your shots off center.

Make sure you experiment. You may choose aperture priority to make sure you have adequate depth of field. I like to experiment by shooting on manual (bracketing), once I have chosen the basic exposure from program priority.  Manual shooting makes you familiar with the exposures that work in various settings. I like to see the effects of more or less exposure (or even flash in the foreground) on the clouds as they are lit up by the dying of the light.

Here are some other sunset shots I took this summer in Bailey Island, a beautifully isolated spot on Casco Bay, an hour from Portland.

Sunset-3.jpg
Sunset-2.jpg

I suggest you to go out and try yourself. You might make a few mistakes but that is how you learn and grow. Best of luck!