Daily Photography Tips

Things To Remember While Shooting At The Beach

This post is written by Guest Contributor, Janet Ochs Lowenbach. If you are also interested in writing a guest blog, please reach out using the form in the Contact page.

When you take out the rafts and sun hats, don’t forget to bring along your camera, because summer is an excellent time to take beach scenic shots. If you choose the right time, and are careful to protect your camera from the elements, you can get some beautiful photos to add to your portfolio and your wall.

First: the warnings. Sand and salt spray can play havoc with your camera, so use your head.  Don’t open your camera any more than you have to: change your memory card at home. Keep your camera shaded under a blanket or umbrella not like a sitting duck baking in the hot sun. Don’t change your lenses at the moment your friend is shaking out a towel. And if sand or salt get in, immediately and carefully attempt to blow it or wipe it out.  If you are not sure you have removed the offenders, take your camera to your repair shop.

If the weather is too harsh, consider leaving your camera at home and bringing a sealed disposable or simple underwater camera. Or, you might use a plastic bag over the camera body drawn forward and secured around the (open) lens with a rubber band.

Be careful with the lighting. Beach (and snow) scenes are so bright they fool the camera into underexposing.  Do set the exposure properly either by reading off your hand or an 18 percent gray card and shooting on manual. Or simply open up one or two f stops to increase the light. You can check the pictures on the camera back if you have a digital camera and compensate accordingly.

Don’t just stand there and shoot into the waves: Look for different ways of seeing, other kinds of lines that lead the eye to the subject, and different ways to revealing the subject. Ask yourself what story you are trying to tell about the waves —are they symbols of a gentle nature? A ferocious adversary?  Then try to demonstrate your answers.  You've been unaccustomed to thinking like this, but such thinking will help you produce out-of-the-ordinary pictures.

Look for the quality of light. Don’t go out at noon and blast away. Go out in the early morning even before sunset or in the late afternoon, when the sun is low in the sky.  At night, you will find a warm, reddish light that makes your photos glow with fire and emotion.

Composition is important. You don’t want your subject smack in the middle of the photo. Picture a tic-tac-toe grid over your viewfinder. (This is the rule of thirds.) You want your subject not in the center but at one of the points where the lines intersect.

Shooting-at-beach-2.jpg

Walk around the shot, face the waves, move closer and shoot sideways so the water fills the frame and you have land and water as the background. Shoot small things — the bubbles in the water as it pours over the shore, footprints on the sand, a dried out crab shell. Look and look and try to find something different, something that speaks to you and helps you speak differently to the audience.

In the pictures below, I encountered a log on the shore — unusual for the scene and a way to vary the lines and the lighting in the photo. In the first shot, it appears in the lower third of the photo to the left. In the second it is backlit and appears in the lower third to the right. The lighting is pastel.

Shooting-at-beach-3.jpg

The third shot attempts to show the power of the waves.

Shooting-at-beach-1.jpg

Sometimes unexpected things happen, as when my dog ran into the picture. If you expose for and set up a scenic shot, wait for a minute. A bird may fly across the sky; a person or dog may run across the view. This can only make things better.

Nikon CLS Vs PocketWizard

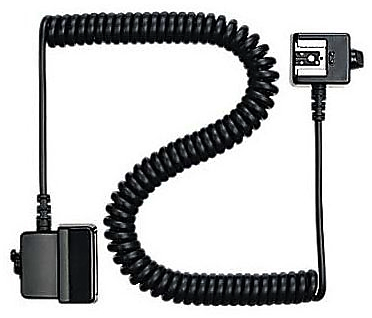
There are two ways to control the remote flash units from your camera. One is using wired connection (using Nikon 4765 SC-28 for example) between the camera and the flash units and other one is wireless method to communicate between the camera and the flash unit. With the increase popularity of wireless technology, wired technology are rarely used these days. Also, wired technology is limited with the distance if you want to experiment with the distance and the angle of the flash units. In addition to that we have got lots of choices with wireless technology and can choose one of the many options available in the market. You just have to decide what you want to do and what you want to achieve and get the kind of device that works best for you. In today's post, we are going to talk about two wireless technologies which are dominantly popular and they are Nikon CLS (Creative Lighting System) and PocketWizard. Let's discuss what are the benefits of using one to another.

Nikon CLS Vs PocketWizard

There are some photographers who think CLS Vs PocketWizard is like Nikon Vs Cannon debate and they have their own arguments about these two devices. I am not thinking of taking side of any technology or equipment and will try to describe these technologies by doing simple comparison with different perspectives and it’s up to you to decide which technology works best for you.

Nikon SB-800

Nikon SB-800

1. Equipment cost

As of today, if you want to buy the complete set (FlexTT5, MiniTT1 and 804-709 AC3 Zone Controller) of PocketWizard to seamlessly control your flash units remotely, it costs around $497.00 on Amazon. And if you want to buy the Nikon flash units with CLS technology, SB-600 costs you around $320.00 and SB-900 costs you around $499.00. You do not have to buy a transmitter for SB-600 or SB-900 to work if your camera has a commander mode. Your camera's built-in flash can act as a transmitter when it is set to commander mode.

That means you will be spending extra money on PW if you already have the camera capable of controlling the CLS flash units remotely. But that investment worth every penny if you need an extra feature like extra distance range between the flash units and the camera or working in various angles which we will discuss next.

PocketWizard

PocketWizard

2. Working Range

If you plan not to put your flash units farther than 30 feet from your camera (adjusting angle to reach an infrared signal from the camera), it would be a wise decision not to invest money on PW. But if you are planning to play with different angle of lights and place the flash units farther than 30 feet, PW is the way to go. It gives solid control over the great distance. When used as a transmitter, the FlexTT5 can provide TTL auto flash at distances of up to 800 feet and conventional triggering up to 1200 feet with the aid of a flip-up antenna.

3. Control

Nikon CLS system has a limitation of distance but you can control the remote flash units from the camera whereas today’s PW can go up to 800 feet and works great with an auto FP high speed sync and iTTL mode. Nikon CLS systems are an infrared system and that is the reason many photographers argue that it doesn’t work if the unit falls into the direct sun light. Nikon CLS system works great if the distance and the working angle matches with the camera (line-of-sight) from where it transmits an infrared signal to the remote flash units. But PW works on radio signal and can reach up to 1600 feet.

Nikon CLS systems and PW both work great in an auto FP high speed sync mode and supports iTTL mode. So it is just a matter of the distance and the working angle whether you want to use the CLS technology or buy the PW system.

4. Compatibility

Nikon CLS system only works with the Nikon’s compatible flash units whereas PW works with any kind of system. If you have any flash units other than the Nikon, you can use PW to communicate between your Nikon body and the third party flash unit. All you have to do is, slide MiniTT1 into the hot shoe of the camera and slide your flash units into the hot shoe of FlexTT5. It is very reliable piece of technology and works great.

Note: Nikon CLS is not a device but technology built inside Nikon's advanced flash units like SB-600, SB-700, SB-800 and SB-900 which is used to communicate between the Nikon camera and the flash units.

Using Autofocus With The Nikon D7000

Autofocus can sometimes be frustrating for the new digital SLR photographer, especially those coming from the point-and-shoot world. That’s because correct focus plays a greater role among your creative options with a DSLR, even when photographing the same subjects. Most non-DSLR digital cameras have sensors that are much tinier than the sensor in the D7000. Those smaller sensors require shorter focal lengths, which have, effectively, more depth-of-field. The bottom line is that with the average point-and-shoot camera, everything is in focus from about one foot to infinity and at virtually every f/stop. Unless you are shooting close-up photos a few inches from the camera, the depth-of-field, is prodigious, and autofocus is almost a non-factor.

D7000 Front View.png

The D7000, on the other hand, uses longer focal length lenses to achieve the same field of view with its larger sensor, so there is less depth-of-field. That’s a good thing, creatively, because you have the choice to use selective focus to isolate subjects. But it does make the correct use of autofocus more critical. To maintain the most creative control, you have to choose three attributes:

1. How much is in focus: Generally, by choosing the f/stop used, you’ll determine the range of sharpness/amount of depth-of-filed. The larger the DOF, the "easier" it is for the autofocus systems’ locked-in focus point to be appropriate (even though, strictly speaking, there is only one actual plane of sharp focus). With less depth-of-field, the accuracy of the focus point becomes more critical, because even a small error will result in an out-of-focus shot.

2. What subject is in focus: The portion of your subject that is zeroed in for autofocus is determined by the autofocus zone that is active, and which is chosen either by you or by the Nikon D7000. For example, when shooting portraits, it’s actually okay for part of the subject- or even part of the subject’s face to be slightly out of focus as long as the eyes (or even just the nearest eye) appear sharp.

3. When focus is applied: For static shots of objects that aren’t moving, when focus is applied doesn’t matter much. But when you are shooting sports or birds in flight, or children, the subject may move within the viewfinder as you are framing the image. Whether that movement is across the frame or headed right towards you, timing the instant when autofocus is applied can be important.

Reference: David Busch's Nikon D7000 Guide to Digital SLR Photography